There's no manual online for this program aside from the official one that only provides sample art that would have most likely come with the program (linked here), so here's one made entirely from scratch and in excruciating detail.
This manual assumes that the user already has a copy of Jedai, though if not, a copy exists in the archives, linked here.
This manual was created by LCat4Ever on Twitter, or xx_crimsoncat_xx on Discord.
Controls
Left-Click Mouse/Drawing Pen: Can be used to click the buttons and draw in the program (the drawing pen may lag slightly).
F12: Allows for the mouse to move within the program and outside of it once F12 is pressed again.
Right-Click Mouse: Can be used to return to the previous menu or exit out of the current menu (similar to using the Backspace button or ESC button).
However, when in the drawing area, the right-click brings up the paint options menu.
*Warning: Control+Z does not work with the program, so there's no way to reverse mistakes. The best option is to save frequently and load in the previous save every time.
How to Open
Have a PC-98 emulator installed that can load .hdi files, like NekoProject21 or T98-Next.
Since Jedai runs on the PC-9821, NekoProject21 will need to be used.
Anex86 doesn't support PC-9821, so that cannot be used.
This will solve the “256 Colors” error as well.
If NekoProject21 is being used, go to the “Harddisk” tab at the top and load the Jedai.hdi file.
Then reset the program by going to the “Emulate” tab and clicking on “Reset”.
If T98-Next is being used, look for the “HD DRIVE” under the “Disk” tab in the “Main” menu and click in the gray box area to the right of the red rectangle to load in the Jedai.hdi file.
Click the power button in the top left corner in order to start the program.
The program should load correctly.
Layout
The screen that pops up when first opened is black with many tabs at the top, which will be discussed in great detail in order to provide an idea as to which button does what.
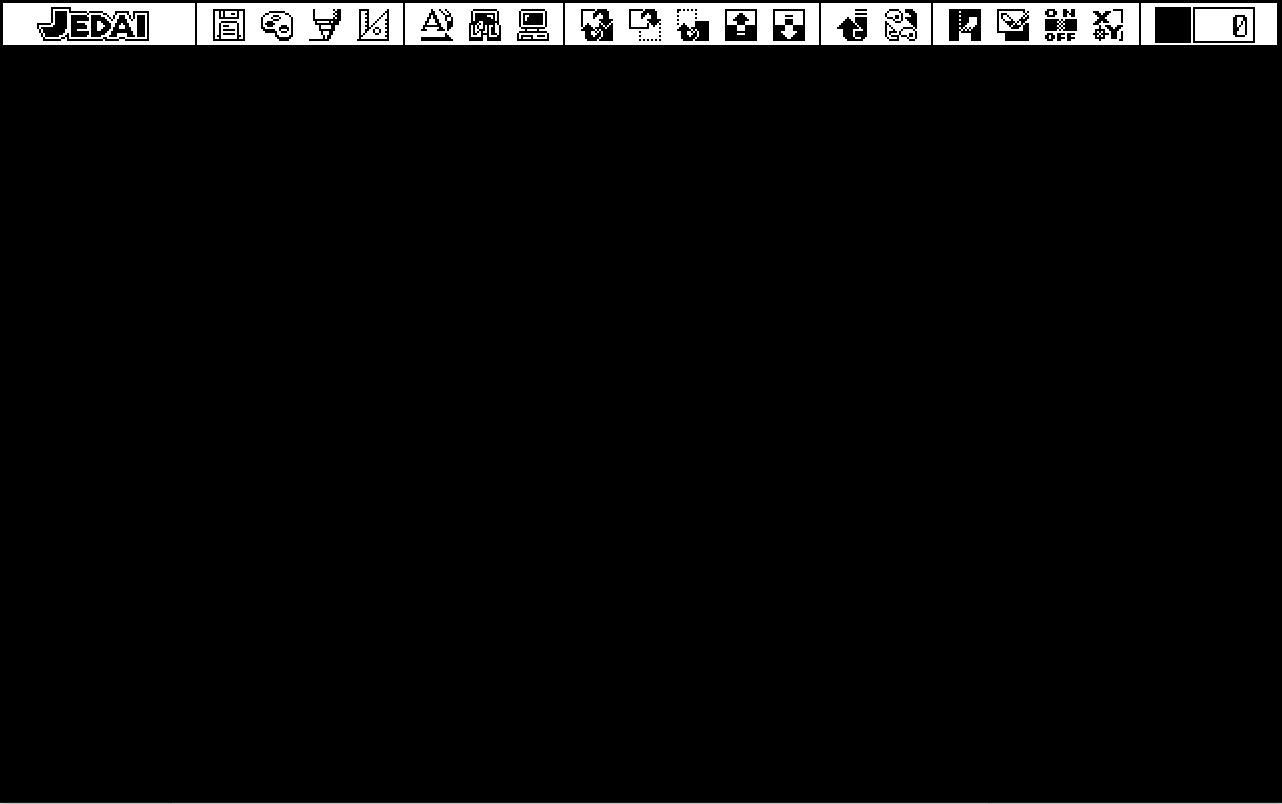
Floppy Disk Icon
This is what first pops up when clicking on the floppy disk icon to the left of the program, and to the right of the “JEDAI” text.
First Icon
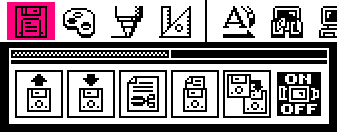
Going from left to right, the first icon with the floppy disk on it, when clicked on, will produce a second pop-up menu with different image file types, such as “CMP” (JPEG Bitmap), “BMP” (Bitmap), “MAG” (MAKIchan Graphic loader; Can also be found in the PC-98 art program, Multi-Paint System) , and “TIFF” (Tag Image File Format).
This button allows for the user to load an image that has one of these formats from inside the Jedai program itself. The image has to be one that is 8-bit/supports only up to 256 colors. If you load in an image that isn't 8-bit, then a box will pop up saying “無効なファイルです”, which means that the file is invalid.
The size of the image doesn't matter, though the sizes listed under the “Second Icon” header are preferable since it's possible for the image to not show up properly in the program.
After clicking one of the buttons as seen below, a directory will pop up and allow for the user to load an image with the corresponding format (which, in this case, is a .BMP file).
An image can only be loaded if it is added to the Jedai.hdi file itself beforehand, which can be done by opening Jedai in DiskExplorer and importing the image.
If the user decides against loading an image, simply right-click to return.
Second Icon
The second icon will produce a larger menu consisting of the previously mentioned image formats, as well as the options for 256 colors (8-bit) and 16 colors (4-bit); and the image sizes of 640×400, 640×480, 640x800, and MANU.
This button allows for the user to save their drawing in one of these image formats, as well as being able to choose whether to save the image with 256 colors or 16 colors.
The bottom row decides the size of the image. The first three are pretty self-explanatory, though the fourth button probably means “Manual”, which allows for the user to box select a certain part of the image to save, so the size can be however large the selection is.
The same directory will pop up once the user clicks a specific image format, though they will be able to name the image file this time. There is a 12-character limit and spaces are not allowed.
Third Icon
The third icon with the scissor in front of a document, when clicked, will produce the directory menu immediately, and all of the files in Jedai will be visible, not just the images.
BE CAREFUL! This icon allows for the user to delete any files within Jedai. This can be useful when getting rid of images that the user won't need anymore, but be careful not to misclick or else one of the major components of running Jedai might be deleted instead.
The user can select one or multiple files to delete, which will prompt this dialog box, as seen below. The Japanese next to the image file says “を削除します”, which essentially means that the program is asking if the user wishes to delete the file. The user can choose whether to delete one file at a time, all at once, or to cancel the process.
Fourth Icon
The fourth icon with the floppy disk and the document sticking out the top of it will produce a menu that has “DRIVE” on it, as well as arrow keys that can switch between different drives, which will be B and C (the user should already be using Drive A).
When the user hits okay after choosing a drive, they will be prompted with the following text: “DRIVE B: に初期化するディスクをセットして下さい.” This roughly translates to: “Set the disk to be initialized in DRIVE B,” meaning that the main drive that the user will save their images to and load their images from will change to a different drive.
This really isn't as necessary nowadays since this program will most likely be loaded in an emulator as opposed to an actual PC-9821, but it's still good to know.
Fifth Icon
The fifth icon with two floppy disks and an arrow pointing to one of them will produce the menu below, which shows two drives and an arrow pointing from one drive to another.
This prompt will pop up after hitting the OK button: “DRIVE B: に転送元 DRIVE C: に転送先 のディスクをセットして下さい.” This essentially asks the user if they want to transfer the contents from Drive B to Drive C.
Sixth Icon
The sixth and final icon in this menu with the “ON OFF” text on it is a bit dubious since the most that happens upon clicking on it is that it either turns on or off.
It's possible that this affected the PC-9821 itself, though there's no way to prove this without owning one.
Otherwise, this icon does not do much, so there's no need to really worry about it.
Paint Palette Icon
The icon to the right of the floppy disk icon will produce a menu that includes an array of colors at the top that can be clicked on and changed through the arrow keys on the side; gradient and dithering options; the current color (along with the current color's associated number); checkerboard patterned colors underneath that will draw alternating colors for each pixel; and a selection of icons at the bottom.
First Row
Starting at the top, the array of colors can be clicked on and the color will be chosen and reflected in the box in the row under it, as seen below.
The arrow keys can sort through 16 different provided color palettes, starting from 0 and going to 15. These palettes consist of all the colors that can be chosen in the program, though the user can choose colors from different palettes to draw with.
Here are some of the different palettes, as examples:
Second Row
The second row consists of the gradient option, the dithering option, and the current color and code (which can't be clicked).
The gradient option, when selected, will allow for the user to use a gradient in their art (choosing colors will be described under the “Fourth Row”).
It will then force the user to box select any area in the program and load in the gradient top-down, which will show up as shown below.
The dithering option, when selected, will do the same as the gradient option and make the user box select an area to dither (choosing colors will be described under the “Fourth Row”, though the provided colors are black and white).
Third Row
The third row simply consists of different checkerboard patterns that the user can choose from and draw with.
It will draw the same as if the user chose a normal color, except for the alternating colors every pixel.
Fourth Row
The fourth row involves five different icons as seen below.
The first icon on the left with the paint tube will bring up a huge menu with many different things that can be done.
The first thing that stands out is the large selection of colors in a 16x16 table (i.e., 256 colors), which makes it a lot easier for the user to choose colors.
However, the user does not have to only choose colors from the given table–they can add their own!
This is where the RGB and HSV area comes into play. Anyone who has made art or used Photoshop has seen these before, but just in case, RGB is Red, Green, Blue, and HSV is Hue, Saturation, and Value.
RGB and HSV can be adjusted to create a new color and replace the color that is currently selected, as seen below when changing the selected color to a new, random color.
This can be done by dragging the left mouse button across the white area in between the arrows, or just clicking the arrows.
The new color created is also reflected in the color box and has a number associated with it, like seen below.
Avoid changing the black color in the top left corner to another color or else it might change the program color as well.
The bottom row has a few different icons, like what's shown below.
The first two icons affect the rainbow-y colored boxes, and the other two similar icons to the right affect the black and white dithered boxes.
The first icon with the finger pointing down changes the cursor to a box-select cursor, and a box saying “START” will pop up on the right side (and the word will change to “END” once a second color is clicked).
This allows for the user to choose two colors from the 256 colors that will essentially create a gradient, which is reflected in the rainbow-y boxes, as seen below.
The icon with the arrow forming a circle just allows for the user to rotate the gradient.
The second set of icons function the exact same way, except now a dithering pattern is created between the two colors (the dithering pattern can also be rotated).
The colors that are chosen for the gradient and dithering pattern will be shown once exiting out of this menu.
The row of icons on the right side of the box of colors also have a variety of functions, as seen below.
The top left icon with the arrow pointing to the right allows for the user to click a color and choose another color at the end to create a gradient of colors in the table that are reflective of the colors that were chosen.
The top right icon with the three boxes allows the user to select multiple colors in the table with the left mouse button, and after clicking the right mouse button, a table pops up that allows for the user to adjust the Brightness (top icon), the Saturation (middle icon), and the Hue (bottom icon) of the chosen colors and view the changes in real-time, as seen below.
The second row, left icon with three arrows pointing up and a checkerboard-pattern prompts the user to click colors, which are then moved to the bottom right corner and are stacked on top of one another after every color that is clicked. It seems to essentially be a way to sort colors manually.
The second row, right icon with a 3x3 board and arrows has five different functions to choose from, as seen below.
The first icon to the very left allows for the user to see what colors are currently being used in the art piece. The colors that aren't being used are crossed out with a white line. Left clicking will get rid of the crossed out colors.
The second icon with the lamp automatically sorts the colors in the table based on their Brightness. A box will pop up once the colors are sorted asking if the user wants to keep the changes or not.
The third icon with the person functions similarly to the Brightness icon, except it sorts the colors in the table by how Saturated they are. A box will pop up once the colors are sorted asking if the user wants to keep the changes or not.
The fourth icon with three erasers on it sorts the colors based on how much they're being used in the art piece–the colors at the top left of the table are used the most, and the colors at the bottom right are either used the least or not used at all. A box will pop up once the colors are sorted asking if the user wants to keep the changes or not.
The fifth icon with the basket of paint tubes sorts the colors in the table by which ones are being used or not, going from left to right. A box will pop up once the colors are sorted asking if the user wants to keep the changes or not.
The third row, left icon with arrows pointing everywhere affects the shape of the gradient and dithering pattern by allowing for the user to choose whether the shape should just go in one direction, spread out in a square shape, or spread out in a radial/circular shape respectively, as seen below.
The third row, right icon with “ON OFF”'s function has been mentioned before, but it's not quite known what this function does, so it's possible it affects the PC-9821 itself.
The bottom left icon with the two palettes, when clicked, prompts the user to click one of the colors in the table. Once one of the colors is clicked, the user will have the option to start from the color chosen and select a group of colors and copy the selection to a different area of the table.
If the user does not want to perform this function, just right click and it won't do anything.
The bottom right icon with a computer allows for the user to change the Base color of the art piece (essentially, the background); the Line color of the art; and the color of the “ON OFF” button.
The second icon with a paint tube and checkered pattern to the bottom left of it brings up a menu that allows for the user to create patterns, or use premade ones, as seen below.
The user can choose from a checkerboard pattern in the top row if they want to.
The second table has pre-made patterns that are reflected in the bottom left box when clicked on, which can be edited if the user draws in it.
❤